
Y’all, I’ve been knitting this fabulous super bulky fisherman rib hat for yeeears. By the looks of the Ravelry project page, so have you! Over the years I confess I’ve never been a fan of how the ribs decreased at the top. I was a beginner knitter at the time, and wasn’t sure how to properly switch from fisherman rib to a regular 1×1 rib.

After several years of experimenting and a bit of online research, I’ve discovered the following decrease that gives a perfect, seamless crown, not to mention it’s literally ONE ROW.
So, here’s the updated pattern! I’m leaving the original pattern page up, as it has links with instructions on how to k1below and p1below, which are the main stitches used in this hat. It also has some photo tutorials to help you through. If this is your first time knitting this hat, I would recommend first visiting the original page, then come back to this page when you reach the decrease.
Pattern:
Cast on 42 stitches with size 13 needles (16″ circular). Join to work in the round and place marker.
Rows 1-8: k1, p1 rib
Row 9: switch to size 15 needles. K2tog, p1 below, repeat around. (28 st left)
NOTE 1: On this row, when you p1 below, you will be purling into a knit stitch every other purl due to the stitch groupings of 3. Do not be alarmed. Purl into the knit stitch (BELOW, drop that top loop off!) and continue with faith.
Row 10: k1 below (into the k2tog stitch), p1 as normal into the p1 below stitch from previous row. Repeat around.
NOTE 2: this row is going to look like a hot mess. You’re going to wonder if you’re doing it right, because it looks really ugly; there will be weird lumps and loops everywhere. Keep that faith going – it’ll be about four rows of ribbing before the hat pattern starts to look ‘right’. I promise it looks better on your head.
Row 11: k1 as normal (into k1 below stitch), p1 below. Repeat around.
Row 12: k1 below, p1 as normal (into p1 below stitch). Repeat around.
Rows 13 and on: repeat rows 11 and 12 until hat measures about 8-8.5″ (20-22 cm) in length. You’ll be alternating k1/p1below and k1below/p1 every row. (This was about 15 rows of fisherman rib for me… Technically it’s 30 rows of rib bc of the way you’re dropping stitches, but you’ll visually see/count 15 rows of stockinette.) You should be able to try the hat on for length at this point, since the decrease is only one round.
DECREASE: (transfer stitches to DPNs as you work) k3tog all the way around. You will have 1 at remaining at the end, knit it. Cut a longish tail, thread on needle, draw through stitches, and fasten off.
NOTE 3 how to k3tog:
- insert right hand needle into next 2 stitches (on your left needle) like you’re going to k2tog
- slip the 2 stitches onto your right hand needle (don’t knit them!)
- knit the next stitch on your left needle
- pass the two slipped stitches (on right needle) over the just knitted stitch
There are lots of tutorials out there on k3tog, but I liked this photo tutorial for clarity and description of each step. It’s also known as a centered double decrease in common knitter’s terms.
Last note: try to stay focused when making this hat – I’ve made it several times now whilst ‘knitflixing’ and lost track of whether I’m k1below or p1below. It’s really tricky to undo and fix it (I’ve yet to properly succeed), so keep a close eye! Happily this hat works up quickly.
This creates a snug beanie type fit (the hat is pretty stretchy), but if you want a looser, slightly slouchy fit, continue in pattern for about another inch or even two before making the decrease row… You should have enough yarn in a standard 100g skein to eke it out.
THAT IS IT. I know I know… why did it take so long for such an easy solution? I don’t have any good yarning excuses, but I suppose 10 international moves, three rounds of IVF (which required international travel), three babies and a pandemic are as good excuses as any. <insert shrug emoji>

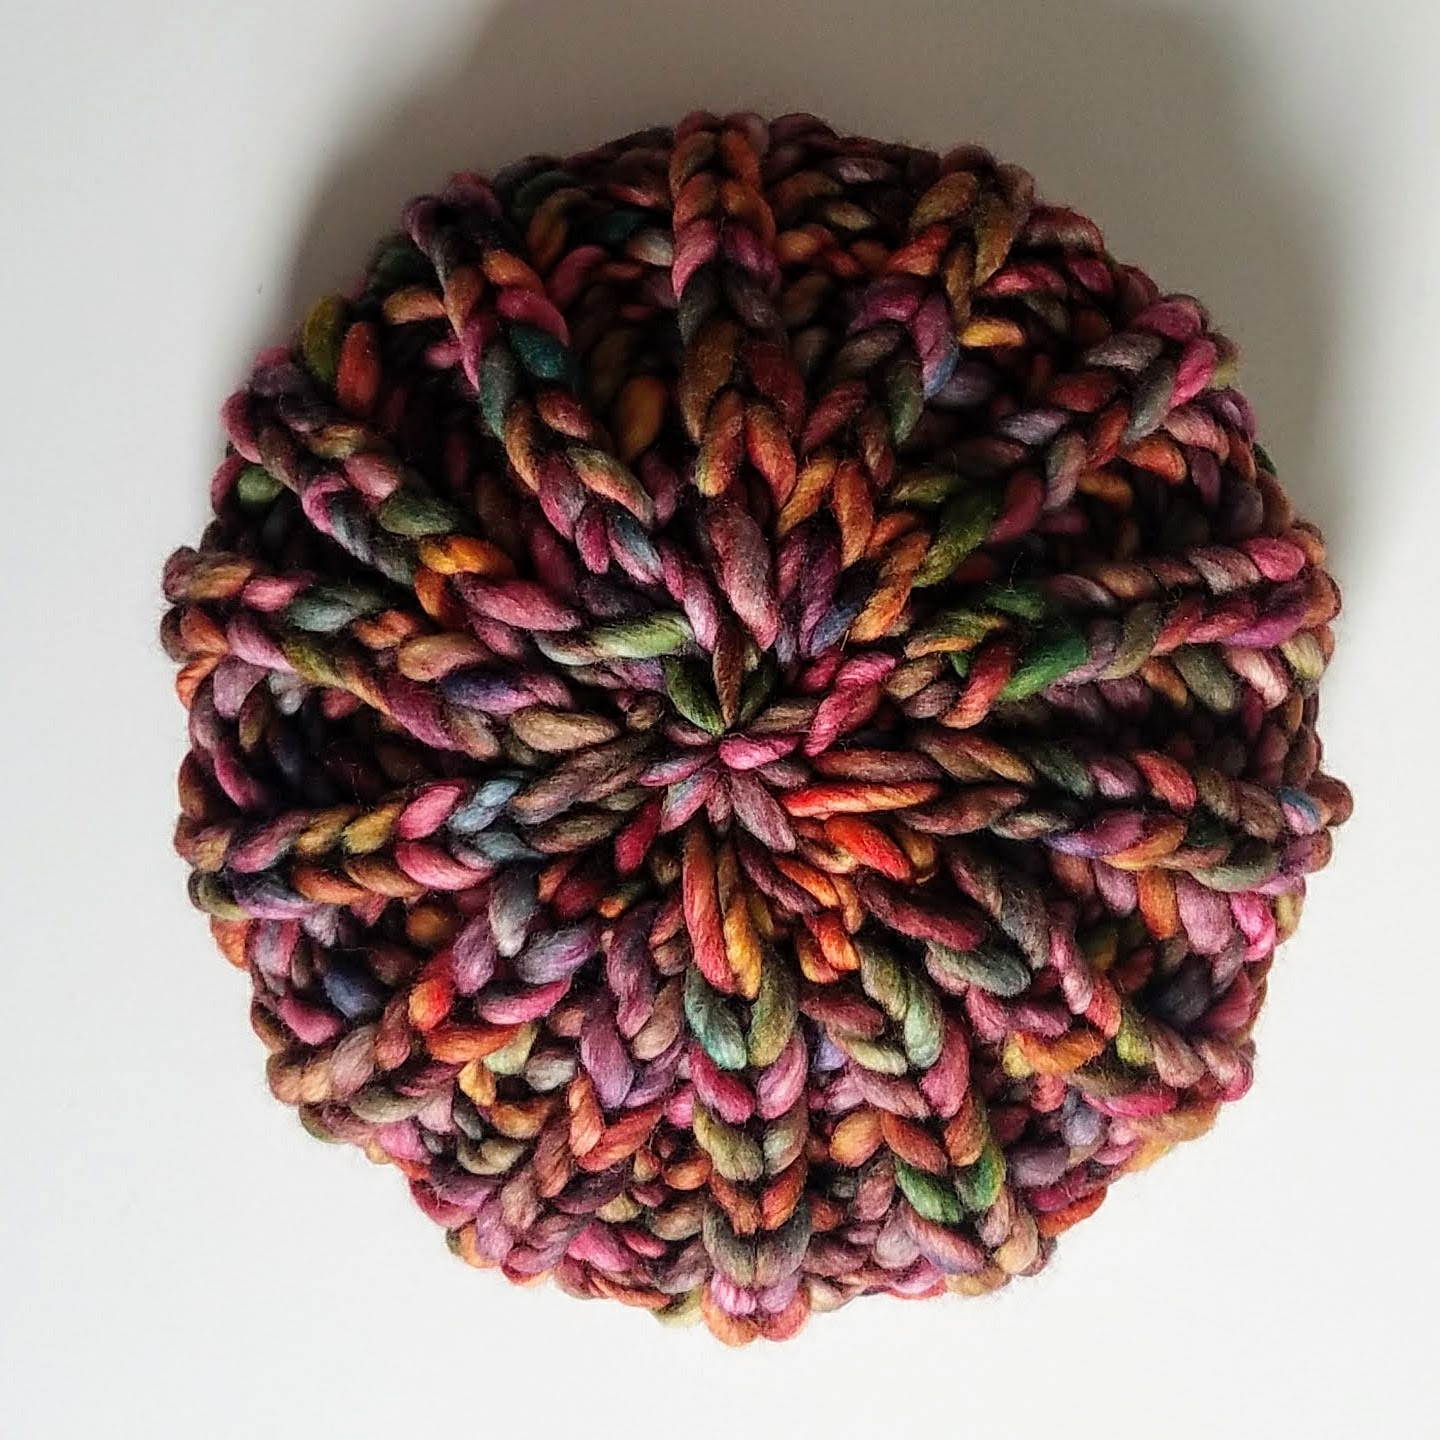
I’ve left the pompom off in these photos so you can clearly see the decrease. It’s so beautiful. So is Malabrigo Rasta.
What’s your favorite item to make with Rasta??
Coming up: I’m working on bulky yarn adjustments, children’s sizing, and also a printable, ad-free PDF. Stay tuned!


can you tell me the company of the yarn used?
LikeLike
I used malabrigo rios in these photos, and lion brand wool ease thick and quick in prior posts, both with great success!
LikeLike